This article provides guidance on how to manage Microsoft 365 shared mailboxes. The article is also available in my podcast and Youtube channel.
View this article as a how-to video on Youtube.
Case #
You need to created, edit and delete shared mailboxes in Microsoft 365. In this how-to article, we will show you how to manage Microsoft 365 shared mailboxes via the Admin Center portal. A shared mailbox is an initially unlicensed mailbox which includes an email address and calendar that multiple people can use.
Solution #
Before proceeding it is important to lay out the pre-requisites for using shared mailboxes in Microsoft 365. In order to use shared mailboxes you first need to:
- Have at least one licensed Microsoft 365 user with a licensed Exchange Online mailbox. You can create an unlimited number of shared mailboxes but remember that each shared mailbox must have at least one licensed mailbox in its list of members.
To manage shared mailboxes of a Microsoft 365 tenant via the Admin Center portal, go through the following steps.
- Navigate with your Web browser to https,admin,dot,microsoft,dot,com.
- On the left pane, click on "Teams and Groups", then click "Shared mailboxes".
- On the "Shared mailboxes" page, click on "Add a shared mailbox" to create a new shared mailbox.
- Provide a name and email address for the shared mailbox and click "Save changes".
- To edit the configuration options of a shared mailbox, click the shared mailbox name and on the popup form on the right, you can configure all available shared mailbox options.
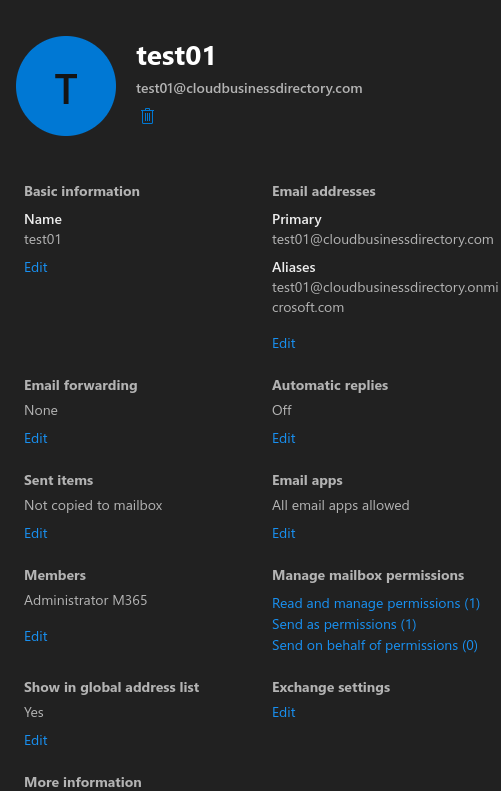
- Under the "Basic information" section, you can edit the shared mailbox name.
- Under the "Email addresses" section, you can edit the primary email address and the corresponding aliases.
- Under the "Email forwarding" section, you can choose an email address as destination forwarding email.
- Under the "Automatic replies" section, you can edit the Out of office configuration for the shared mailbox.
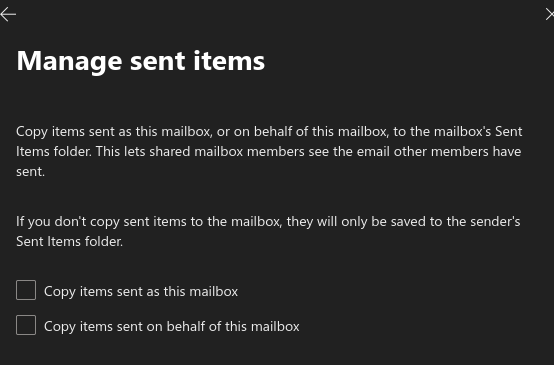
- Under the "Sent items" section, you can choose whether the shared mailbox sent items, which are sent from or on behalf of the shared mailbox, will be saved also in the shared mailboxes Sent items folder or not.
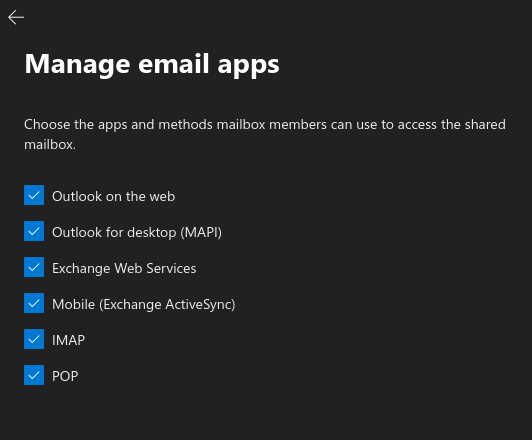
- Under the "email apps" section, you can choose which email apps can access the shared mailbox.
- Under the "members" section, you can add or remove members from the shared mailbox.
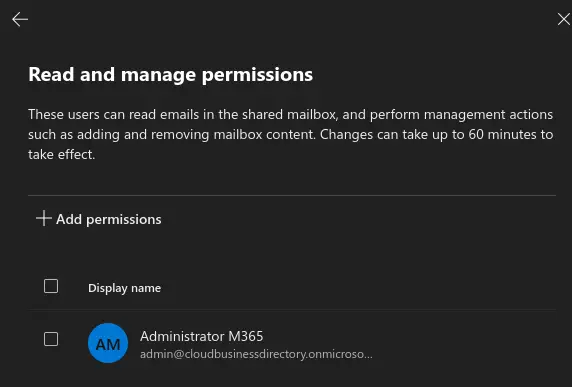
- Under the "Manage mailbox permissions" section, you can set the Read and manage permissions, the send as permissions and the send on behalf permissions on the shared mailbox.
- Under the "Show in global address list" section, you can choose whether to include the shared mailbox in the global address list or not.
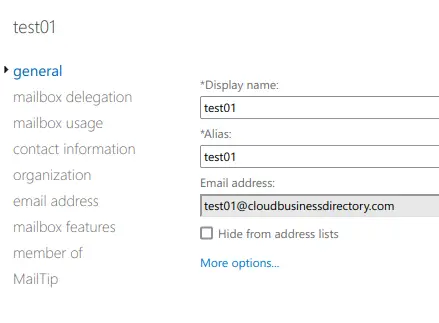
- Under the "Exchange settings" section, you can configure further shared mailbox settings in the Exchange Online admin center. These settings include general settings, mailbox delegation, mailbox usage, contact information, organization settings, email address, mailbox features, member of and Mailtip settings.
Now that you have setup the shared mailbox, you can access it via any of the available email apps, namely Outlook on the Web, Outlook for Desktop, Exchange Web Services, Exchange Active Sync, IMAP and POP. For example, to access the shared mailbox from the Outlook on the Web account of any member of the shared mailbox, carry out the steps below.
- Navigate to Outlook on the Web at https,outlook,dot,office,dot,com, and authenticate with the user credentials of a shared mailbox member.
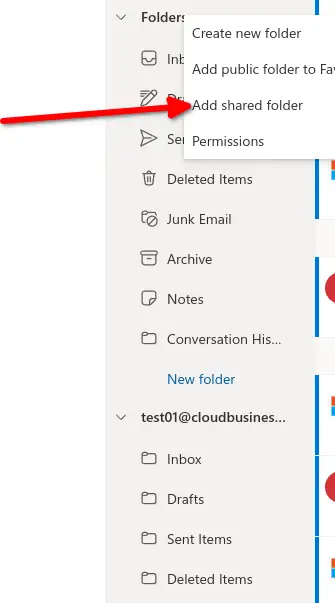
- On the left pane, right click on the "Folders" row and choose "Add shared folder". Then provide the email address of the shared mailbox in question. Choose to "use this address" and click "Add".