Case #
This KB article provides guidance on how to backup on-premises server workloads with Azure Backup. You have one of the following Azure-supported on-premise server workloads and data and you need to take backup of them by using the Azure Backup service.
- Files and folders
- Hyper-V or VMWare virtual machines
- Exchange Server mailboxes
- Sharepoint Server sites
- SQL Server databases
- Physical server hosts for bare metal backup and recovery

This KB articles provides step-by-step guidance on how to backup on-premises server workloads with Azure Backup.
The article includes various sections to showcase how to backup any Azure-supported on-premises workload. Currently the "files and folders" backup and recovery procedure is documented based on the Microsoft Azure Recovery Services (MARS) agent. The MARS agent high level architecture is the following.

Solution #
SQL Server databases backup #
Please note that you can make use of the Microsoft Azure Backup Server (MABS), whose installer internally installs also the Microsoft Azure Recovery Services (MARS) agent, to combine backup operations for both SQL Server databases (via MABS) and files/folders (via MARS).
Configure Azure Recovery Services Vault #
Azure Backup service utilizes Azure Recovery Service vault to create the following configurations. It is based on an agent application or virtual machine acting as the proxy between the on-premises workloads and the Azure Backup service.
Follow the steps below.
- Navigate to the Azure Management portal at https://portal.azure.com and logon using your Azure global admin account or equivalent account with sufficient roles to perform the backup operations.
- Create an Azure Recovery Services (ARS) vault.


- In the Overview section create a new backup configuration inside the created Azure Recovery Services vault.

- Choose which types of on-premise server workloads you need to take backup of. Choose "On-Premises".

- For on-premise workloads, you have the following possible backup sources.

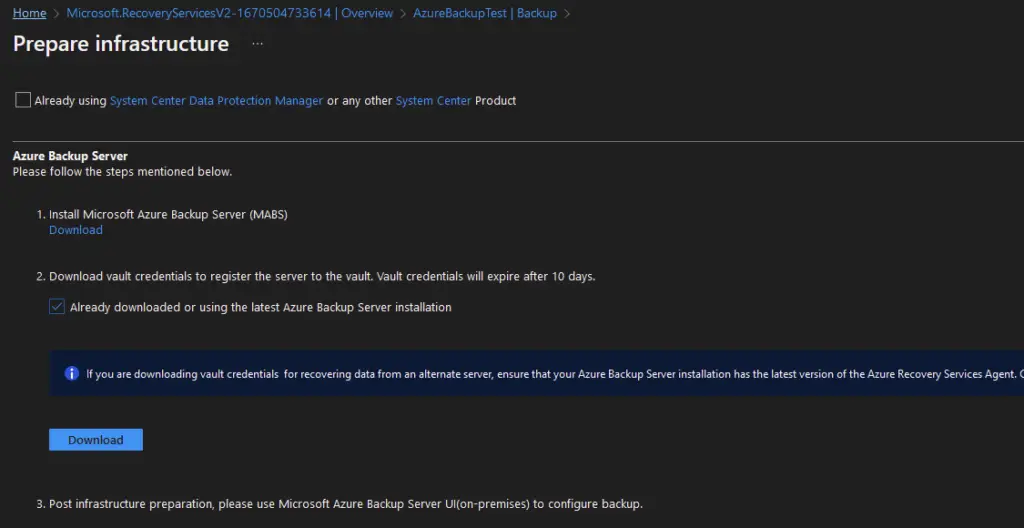
- Click "Prepare infrastructure".

- Download Azure MABS server and vault credentials and run the MABS server setup on the target machine.

On the Azure MABS server download page, follow steps below.
- Step 1: Click on download and select all the files. All the files should be in the same folder post successful download.
- Step 2: Run MicrosoftAzureBackupInstaller.exe from the download folder with elevated privileges.
- Step 3: Ensure Microsoft .Net 3.5, Microsoft .Net 3.5 SP1 and Microsoft Net 4.0/4.5/4.6.1 is installed. If you are installing agent on Windows Server 2008 R2 SP1, install Windows Management Framework 4.0
- Step 4: Refer to detailed documentation for configuring your Microsoft Azure Backup server for workload backup (http://go.microsoft.com/fwlink/?LinkID=617319&clcid=0x409)
Please note that if you need to install the MABS server (former Microsoft Data Protection Manager DPM server) on a domain controller, you need to carry out additional configurations, as layed out in the following article: https://learn.microsoft.com/en-us/previous-versions/system-center/data-protection-manager-2010/ff399416(v=technet.10)?redirectedfrom=MSDN.
The following screenshots outline the MABS server installation procedure.


After checking after the missing pre-requisites and rebooting the server, run the MABS installer again.


MABS launches the MARS agent installation wizard.


MABS server installation continues afterwards.


You should first launch the MABS server User Interface ("Management" section) and add at least one disk storage item with sufficient disk space for all your SQL Server database storage needs.


You should now use the MABS server User Interface ("Protection" section) to create your first protection group. Click "New" to continue.

Click "Next" to continue.

Choose "Servers" and click Next.

Choose the workload you need to include to your MABS protection group (in this case all relevant SQL Server databases) and click "Next".

Set the data protection methods as shown below and click "Next".

Set your short-term backup goals and click "Next".

Confirm you have the correct target storage mappings and click "Next".

Choose the Replica options and click "Next".

Configure MABS replica consistency check options and click "Next".

Choose the workloads you wish to protect via Azure Backup and click "Next".

Specify the online backup schedule. For SQL Server databases, a maximum of two backups per day is supported.

Specify the Azure Backup retention policy (daily, weekly, monthly, annual) and click "Next".

Specify the Azure Backup replication policy and click "Next".

Finally, review the settings and create the MABS protection group for SQL Server databases.

You are now ready to monitor and restore from MABS protection groups if needed.

As per your backup schedule, your MABS protected workloads should start appearing in the Azure Recovery Services vault, under the "Backup Items (Azure Backup Server)" section.

Hyper-V or VMware virtual machines backup #
Please note that you can make use of the Microsoft Azure Backup Server (MABS), whose installer internally installs also the Microsoft Azure Recovery Services (MARS) agent, to combine backup operations for both virtual machines (via MABS) and files/folders (via MARS).
Please note that a very similar approach should be taken for physical server hosts for bare metal backup and recovery. This case covers the scenarios of non-supported hypervisors (for virtual machine backup). In these scenarios the virtual machines of the non-supported hypervisor should be treated as bare metal backup cases.
Configure Azure Recovery Services Vault #
Azure Backup service utilizes Azure Recovery Service vault to create the following configurations. It is based on an agent application or virtual machine acting as the proxy between the on-premises workloads and the Azure Backup service.
Follow the steps as outlined in the previous section of this article entitled "SQL Server databases backup" for setting up the MABS server and MARS agent on the target machine from which virtual machine backups will be taken.
- On the Azure portal side, for on-premise workloads, you must choose the following backup source(s)., depending on your requirements.

For all remaining configurations of the MABS and MARS components, consult the previous section of this article and adjust settings for MABS protection groups and backup retention policies to suit your environment's requirements.
Files and folders backup #
Configure Azure Recovery Services Vault #
Azure Backup service utilizes Azure Recovery Service vault to create the following configurations. It is based on an agent application or virtual machine acting as the proxy between the on-premises workloads and the Azure Backup service.
Follow the steps below.
- Navigate to the Azure Management portal at https://portal.azure.com and logon using your Azure global admin account or equivalent account with sufficient roles to perform the backup operations.
- Create an Azure Recovery Services (ARS) vault.


- In the Overview section create a new backup configuration inside the created Azure Recovery Services vault.

- Choose which types of on-premise server workloads you need to take backup of. Choose "On-Premises".

- For on-premise workloads, you have the following possible backup sources.

- For the purpose of this KB article, we will choose "Files and folders" only.
- Choose the storage replication options (LRS, ZRS or GRS), as shown below.

- Click on "Prepare Infrastructure". This will provide you with the appropriate Azure Backup agent to use for your backups, as explained below.

- Download the required Azure Backup agent, depending on the type of on-premise server workload you chose to backup, as follows:
- Microsoft Azure Recovery Services (MARS) agent for files and folders backup
- Microsoft Azure Backup Server (MABS) to be installed on a virtual or physical Windows Server machine. This covers various scenarios for virtual machines and on-premise enterprise product backups (such as SQL server, Exchange Server and Sharepoint server on-premise backup).
Download and configure MARS agent #
In the case of on-premise server files and folders, first download the MARS agent and then download the vault credentials to register the on-premise server to the Azure Recovery Services vault.


- Install the Azure MARS Agent on the source on-premise server. Follow the wizard to complete the installation.

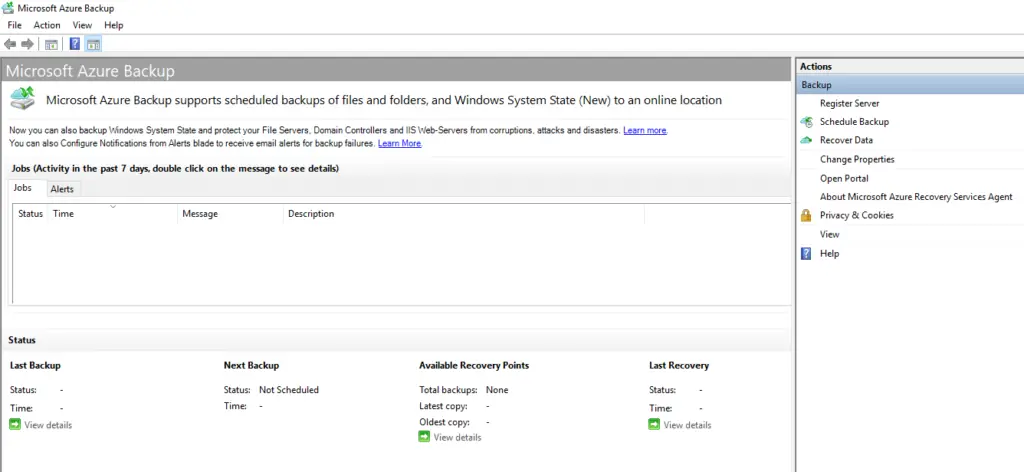
- After launching the MARS management console wizard, register the on-premise server to the vault. Click "Proceed to registration".

- Browse to the downloaded vault authentication credentials and click Next.

- Generate a passphrase and browse to a local path to temporarily save the passphrase file.

- Click "Finish" and then "Yes" to the warning to continue.

- Restoration should now be successful. Click Close to continue.

You can now use the Azure MARS management console on the on-premise server and the associated Azure Recovery Services vault in the management portal to manage the following aspects of your Azure backups:
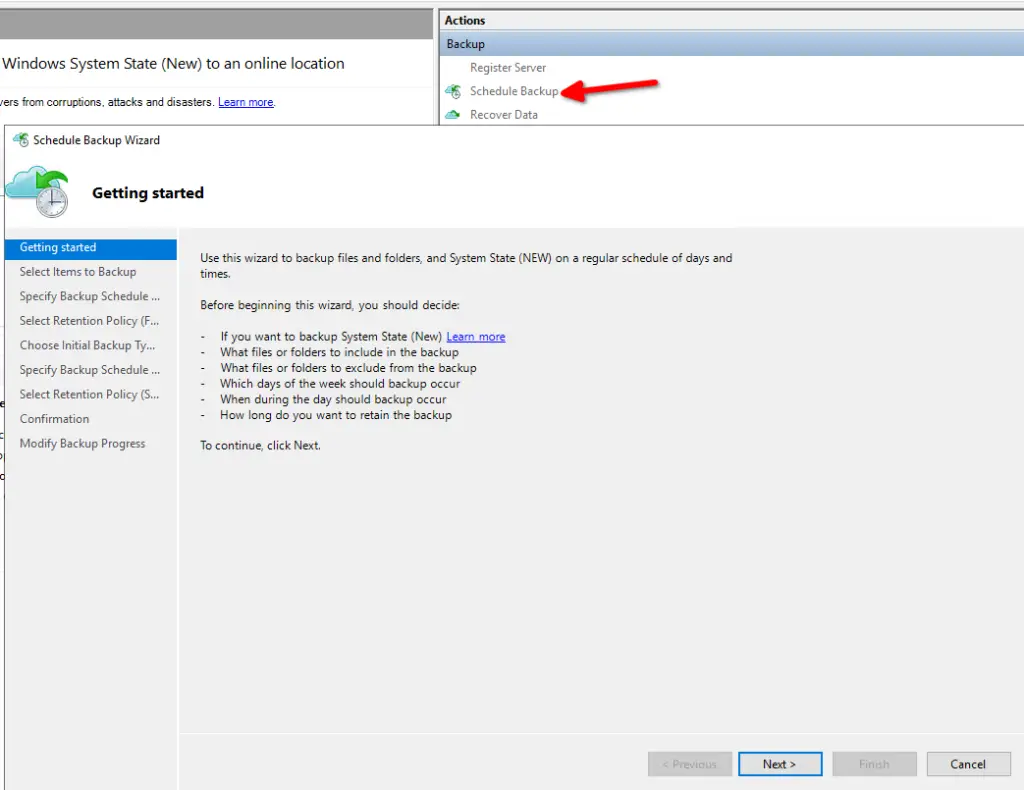
- Schedule backup using Recovery Services Agent UI.
- Once the backups are scheduled, you can use backup jobs page to monitor the backups.
- Restore any files and folders backup set (point in time)


Configure Azure Backup alerts #
You can also Configure Notifications from the Azure Recovery Services Vault alerts page to receive email alerts for backup failures. Click on "Configure Notifications".


Configure Azure Key Vault #
You should also create an Azure Key Vault resource to keep your Azure Backup encryption passphrase file in encrypted format. You should never keep the passphrase file in the same infrastructure from which backups are taken, to protect your data from infrastructure corruption or ransomware attacks.
A Key Vault can keep the following types of data:
- Secrets
- Keys
- Certificates
To create a new Azure Key Vault in the Azure management portal, follow the steps below.
- Create a new Key Vault resource.

Provide the project details and recovery options, as shown below and click Next.

Provide access policy details for the key vault, as shown below and click Next.

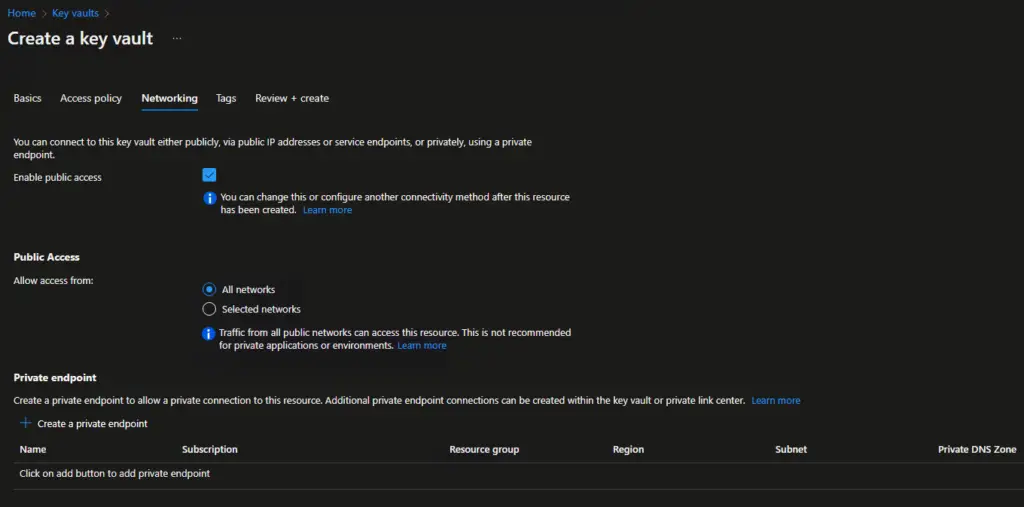
Provide the Azure Key Vault desired networking configuration and click Next.

Click create. The Azure Key Vault is now created.

Multiple backup workloads from on-premise to Azure Backup #
If you need to protect multiple workloads by utilizing Azure Backup, you must install and configure the MABS component. If you already have only the MARS agent installed for protecting files and folders on-premises to Azure Backup and you later decide that you wish to also protect other workloads (e.g. SQL Server databases and/or supported virtual machines) from the same on-premises server, you will have to uninstall the MARS agent, reboot the on-premise server and install the MABS component from scratch. MABS server's installer will internally also install the MARS agent, thus allowing you to support multiple backup workloads to Azure Backup.
Backing up components on remote servers or clients #
In order to create protection groups with workloads which reside on a non-MABS backup server, you need to first deploy the MABS agent on the target machines to be protected. Download and deploy the MABS (DPM) agent as per the following instructions: https://learn.microsoft.com/en-us/system-center/dpm/deploy-dpm-protection-agent?view=sc-dpm-2022.


