Case #
You need to expand the virtual disk size of a Hyper-V virtual machine (VM) but you are not allowed to proceed, even when the VM is shut down, because there are Hyper-V checkpoints (aka snapshots). This KB article provides guidance on how to merge Hyper-V checkpoints.
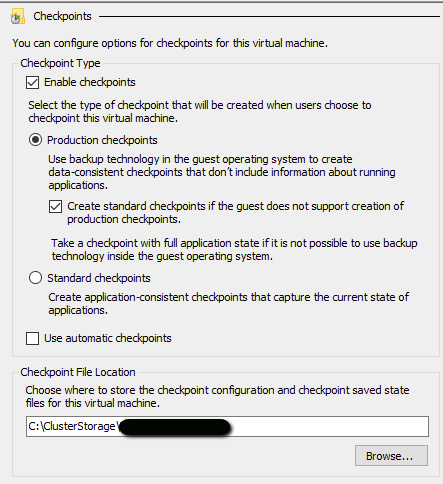
You first check the user-generated checkpoints and realize that there are no user-generated checkpoints available.
You therefore need to merge the system-generated Hyper-V checkpoints, in order to be able to expand the virtual disk size.
In cases where you have a Microsoft or third party backup tool, the backup tool will normally make use of the Hyper-V checkpoint mechanism when taking backups. Generally, the backup tool requests Hyper-V to create a checkpoint for the virtual machine as part of the VM backup process. After the backup tool completes the backup, it sends a backup complete notice, and then Hyper-V merges the checkpoint back into the primary .vhdx file and deletes the .avhdx file. If this does not happen for some reason, you end up with a broken chain of checkpoints which have not been automatically merged.
This how-to article provides step-by-step guidance on how to merge Hyper-V checkpoints by using the Hyper-V graphical management console. You can carry out the same task also by using Powershell.
Solution #
Before you start #
Carry out the following research and checks in your environment, before you start.
- Always ensure that you have full backups of your Hyper-V virtual machines and of all your .vhdx, .avhdx, .mrt and .rct files before proceeding with any Hyper-V checkpoint merge operations. Alternatively, you can export your VM in Hyper-V Manager console, to ensure that you have a recoverable copy of the VM in case of a disaster. If the merge procedure is not performed correctly, data loss may occur. Proceed at your own risk! - Review the following article to see a description of the risk of data loss and what to do to protect against this scenario: https://blog.workinghardinit.work/2014/08/29/manually-merging-hyper-v-checkpoints/.
- If you are running a third party backup solution, your backup solution may be controlling the automatic creation of Hyper-V checkpoints in the background. In this case, you need to consult the backup solution documentation first. The following articles provide further guidance on this:
It is therefore essential to consult your third party backup documentation and/or support team, to ensure that you have the proper configuration in place for Hyper-V checkpoint operation and automatic merging to occur without issues. One such example in the case of the Acronis Cyber Protect 15 software is that you may need to disable the "multi-volume snapshot" option in the Acronis Cyber Protect 15 plan settings. This should eliminate any issues you may be facing with checkpoint merging in Hyper-V.
Merge Hyper-V checkpoints manually in the Hyper-V manager console #
Carry out the following steps to manually merge Hyper-V checkpoints in the Hyper-V manager console.
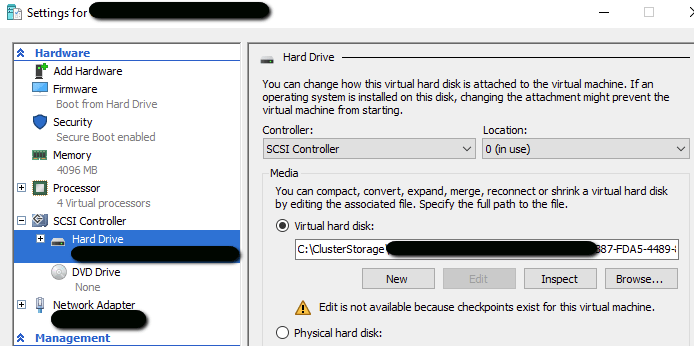
First check in the VM settings to document the Hyper-V checkpoint storage path, as shown in the example below.
Snapshot files for Hyper-V virtual machines are stored in the .avhd(x) file format in the same folder as a parent hard disk image file. Hyper-V snapshots are differencing virtual disks and they have a parent-child relationship with the corresponding parent virtual hard disk. A maximum of 50 snapshots are permitted for each virtual machine. The Hyper-V snapshots are organized in a hierarchical order.
The first thing you need to do is created a hierarchy structure of all .avhd(x) files to map each avhdx file to its immediate parent disk, until you reach the top vhd(x) disk.
To merge Hyper-V snapshots, do the following:
- Open Hyper-V Manager.
- Select the required VM.
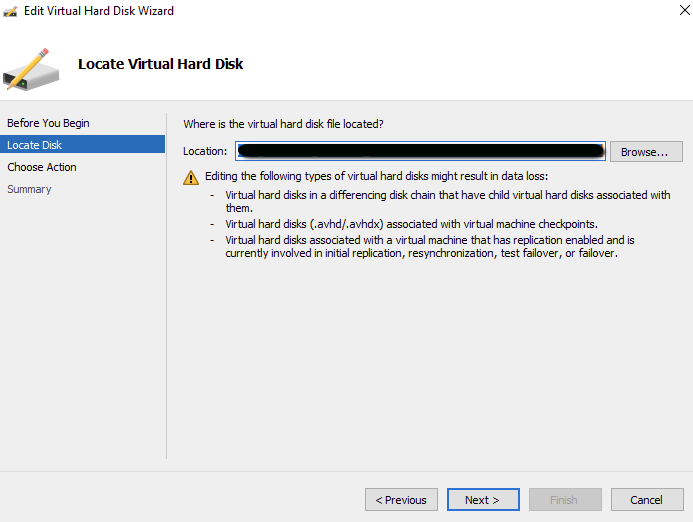
- Click Edit Disk. The Edit Virtual Hard Disk Wizard will open. Click Next.
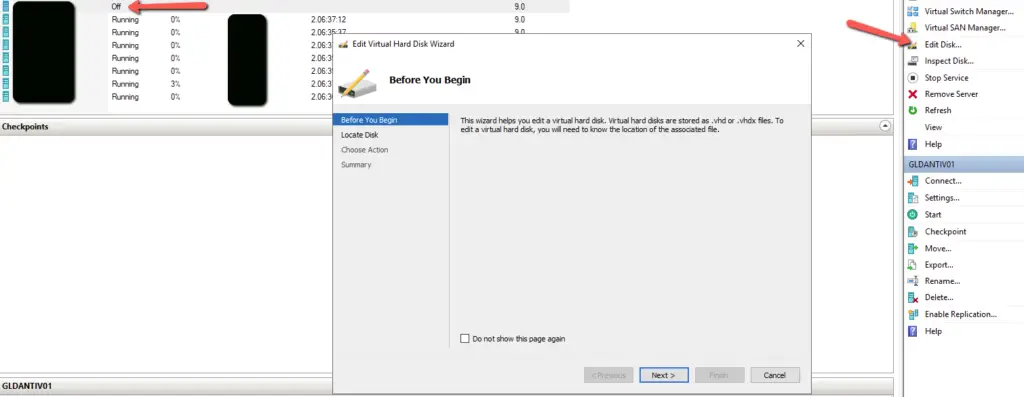
- Click Browse to select the most recent .avhdx file. Click Next.
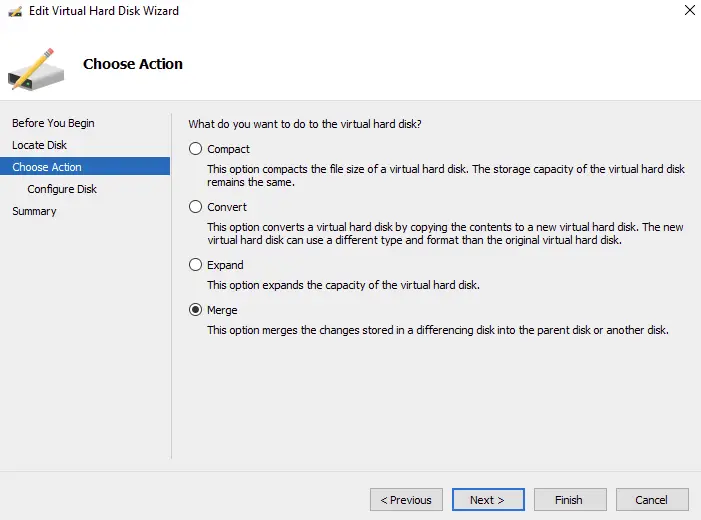
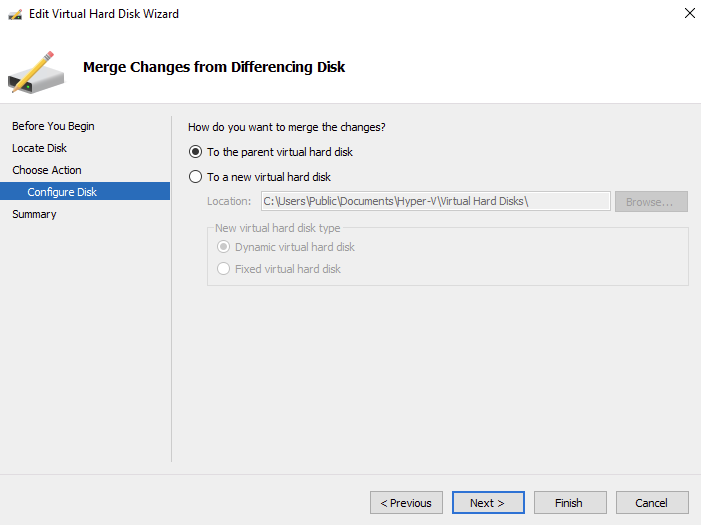
- Select Merge to merge the changes stored in a differencing disk into the parent disk. Click Next. Select To the parent virtual hard disk and click Finish.
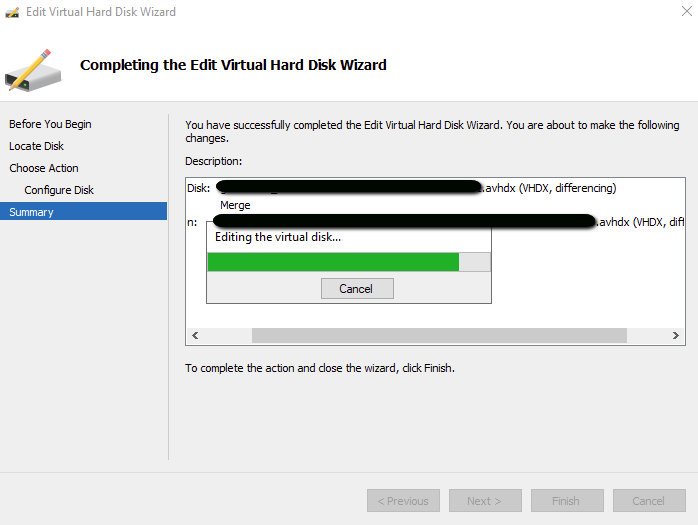
- The merge process shall be carried out.
- To complete the merge process for all checkpoints, repeat the above steps for each .avhd(x) file until all of the changes have been successfully merged into the top-level parent disk.
- At this point you may get an error that a merge process is in progress as shown in the below example.
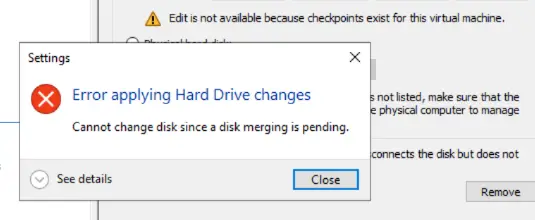
- To go past this error, you simply need to remove the virtual disk in question from either the failover cluster manager or the hyper-v manager console from the specific VM, then click "Apply" and then add the top-level parent disk (.vhdx) again to the virtual machine and start the VM.
- You can now power on the VM and verify operations.
Merge Hyper-V checkpoints automatically by using Powershell #
Before proceeding, consult the following MS article: https://learn.microsoft.com/en-us/troubleshoot/windows-server/virtualization/merge-checkpoints-with-many-differencing-disks. This approach involves the usage of the Microsoft-provided Get-VHDChain function. This section briefly presents this method.
Carry out the following steps.
- Back up all the differencing disk files (VHD files).
- Create and run the
Get-VHDChainfunction. This function is called first to view the AVHDX file chain to confirm that there are no errors between any of the files in the chain and then to generate an output file which in essence is a Powershell script which lists all Merge-VHD powershell commands to be run. - Create and run merge commands. These commands are generated as an output merge.txt file, as explained at https://learn.microsoft.com/en-us/troubleshoot/windows-server/virtualization/merge-checkpoints-with-many-differencing-disks. This can be converted into .ps1 file and you should at minimum at some exception handling logic, to ensure that there will be no issues while running it. A simple try {} catch {break} logic would suffice. The execution of the merge.ps1 script might take a long time depending on the number and size of the checkpoints. You can use the following code in your catch block.
Catch {
      Write-Host -ForegroundColor "Red" -Message 'This is the exception stack of the main script execution: {0}!' -Arguments $_.Exception
      $PSCmdlet.ThrowTerminatingError($PSItem)
      Break
}- When running the merge.ps1 script (renamed merge.txt to merge.ps1 and added exception handling logic first), you may come across the following error. This happens if all previous Merge-VHD commands are successful and only the last one (merging the final .avhdx file with the root .vhdx file) fails.
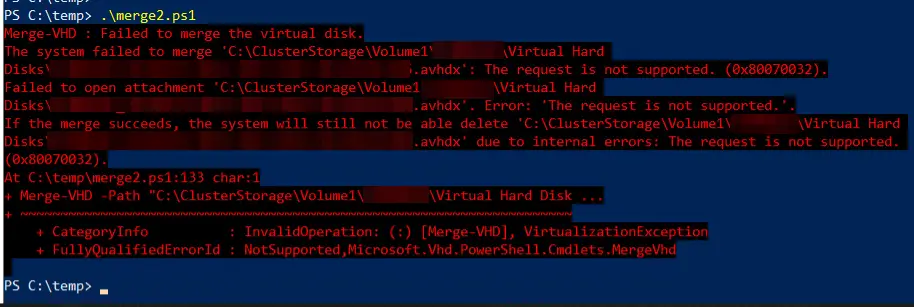
- In some cases the above error can go away if you temporarily remove the VM in question from its Failover Cluster, try the merge command again and then add the VM again to the failover cluster.
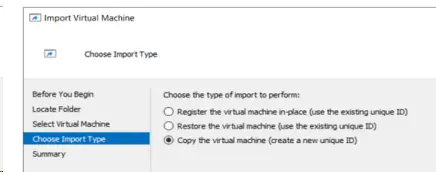
- If you are still unable to complete the merge and the above error persists in Powershell, the only solution is to take backup of the Virtual Machine configuration and take an export of it to a separate folder. After taking the export and the VM config backup, delete the VM and its vdisks and then perform a Hyper-V VM import. Make sure that you choose option to create a new unique VM ID (UUID). After successful import you will see that the import process should have automatically merged any pending .avhdx files found in the exported folder. Issue should now be resolved. If there are still avhdx checkpoints, running the above Powershell Merge-Vhd cmdlet should work without issues.
- Run the Get-VHDChain function again for the affected VM and see if you get any errors. If there are any error lines, the corresponding .avhdx file(s) must be removed from the differencing disks folder.
- You are now at the point where you can change the VM settings to point to the merged parent VHD. If you get an error that a merge operation is in progress (as already explained in the previous section of this document), you simply need to remove the virtual disk in question from either the failover cluster manager or the hyper-v manager console from the specific VM, then click "Apply" and then add the top-level parent disk (.vhdx) again to the virtual machine and start the VM. If you try to simply change the existing .avhx file in the VM settings in the Failover Cluster or Hyper-V manager, you may receive the following prompt and none of the available options would work.

- Start the VM. A successful startup means that the merge completed successfully.
Deleting checkpoints which are visible in Hyper-V manager console #
The above instructions are applicable when you need to merge system-generated Hyper-V checkpoints, which do not appear in the checkpoints area of the Hyper-V Manager console. If you need to merge a user-generated checkpoint which appears in the Hyper-V Manager console, you need to consult the following Microsoft KB article: https://learn.microsoft.com/en-us/troubleshoot/windows-server/virtualization/merge-checkpoints-with-many-differencing-disks. Checkpoints which are visible in the Hyper-V Manager console are the most straight forward to handle. Usually, you can use the Delete Checkpoint command on the context menu to delete these checkpoints. In some cases, Delete Checkpoint and Delete Checkpoint Subtree don't appear on the context menu. This can occur if third-party backup software generates checkpoints but doesn't delete them after a backup operation. In these cases, you can still use the Delete key on the keyboard to delete the checkpoint.
References #
https://community.spiceworks.com/how_to/180656-how-to-merge-hyper-v-snapshots


