Case #
You need to create and deploy Azure Infrastructure As Code (IaC) templates. Infrastructure as Code (IaC) is an approach to infrastructure provisioning and management in which infrastructure resources, such as virtual machines, networks, storage, and other components, are defined and managed through code. Instead of manually configuring and provisioning infrastructure resources, IaC allows you to use code-based templates to define the desired state of your infrastructure. These templates can be version-controlled, tested, and automated, enabling you to easily deploy and manage your infrastructure in a repeatable and consistent manner. This KB article provides guidance on how to deploy Azure IaC templates.
Azure provides two primary options for implementing IaC: Azure Resource Manager (ARM) JSON templates and Azure Bicep templates.
Azure ARM JSON Templates: Azure Resource Manager (ARM) JSON templates are JSON files that describe the desired state of your Azure infrastructure. These templates allow you to define the resources you need, their configurations, dependencies, and other related properties. The templates follow a declarative approach, where you specify what you want the end state to be, and Azure handles the deployment and management of the resources to achieve that state. ARM templates consist of several key components:
- Parameters: Input values that can be provided when deploying the template to customize the deployment.
- Variables: Named values that can be referenced within the template to simplify configuration and improve reusability.
- Resources: Definitions of Azure resources you want to deploy, including their types, names, properties, and dependencies.
- Outputs: Values that are returned after the deployment, which can be used for further automation or tracking.
With ARM templates, you can use various tooling options, including Azure Portal, Azure PowerShell, Azure CLI, or Azure DevOps, to deploy and manage your infrastructure. ARM templates support both initial deployment and subsequent updates to infrastructure resources.
Azure Bicep Templates: Azure Bicep is a domain-specific language (DSL) and an evolution of ARM templates. Bicep allows you to write more concise and readable code while providing a better authoring experience. It is a declarative language that transpiles into ARM JSON templates, meaning you can leverage the benefits of ARM templates while working with a more user-friendly syntax. Bicep templates have a file extension ".bicep" and follow a similar structure to ARM templates but with simplified syntax. Bicep supports all the capabilities of ARM templates and provides additional features like modules for code organization and reuse, iteration and conditional constructs, and better type safety. To deploy Bicep templates, you can use the same deployment methods and tooling options as ARM templates. Bicep is fully compatible with existing ARM deployments and doesn't require any additional infrastructure or services.
Overall, both ARM JSON templates and Azure Bicep templates enable you to define your infrastructure as code, providing a standardized, version-controlled, and automated approach to provisioning and managing your Azure resources. They help in achieving consistent and repeatable deployments while reducing manual effort and ensuring infrastructure configuration consistency.
Solution #
Understand Azure ARM and Bicep syntax #
Coming soon
How to deploy Azure IaC templates #
You should have a plan with a full hierarchy of resources needed in your infrastructure, along with their dependencies. You can use exported templates of a previous Azure infrastructure as guide or utilize available Azure quickstart templates. Always check the dependencies and how to prioritize deployment of resources in a cascading fashion. Avoid circular references in your templates.
To create and deploy Azure ARM templates, carry out the following steps.
- Create an Azure Resource Group (optional). If you don't have an existing Azure Resource Group where you want to deploy your resources, create one by navigating to the Azure portal, selecting "Resource groups" from the left-hand menu, and clicking on "Add." Provide a unique name, select the desired subscription, and choose a region for the resource group.
- Create an ARM template. Create an ARM template using a code editor or an authoring tool. You can use Visual Studio Code with the Azure Resource Manager Tools extension, Azure Portal's built-in template editor, or any other tool that supports ARM templates.
- In your template, define the desired resources, their properties, dependencies, and any other necessary configurations. You can also specify parameters and variables to make your template more flexible and reusable.
- Validate your ARM template (optional) Before deploying your ARM template, it's a good practice to validate it to ensure there are no syntax or logical errors. You can use the Azure CLI or PowerShell to validate your template by running the appropriate command, such as the following.
az deployment group validate --resource-group <resource-group-name> --template-file <path-to-template>or in Azure Powershell
Test-AzResourceGroupDeployment -ResourceGroupName <resource-group-name> -TemplateFile <path-to-template>Fix any issues that arise during the validation process.
- Deploy the ARM template Once your ARM template is validated, you can deploy it to Azure. There are multiple ways to deploy the template, as explained below.
Option 1: Azure Portal #
- Navigate to your desired Azure Resource Group.
- Click on "Deploy a custom template" or "Add" to add a new resource.
- Select "Build your own template in the editor" or "Template deployment."
- Either paste the template code or provide a link to the template file.
- Configure any necessary deployment parameters.
- Review the summary and click on "Create" to start the deployment.
Option 2: Azure CLI #
- Open a terminal or command prompt.
- Run the following command to deploy the template.
az deployment group create --resource-group <resource-group-name> --template-file <path-to-template>Optionally, you can provide additional parameters using the --parameters flag.
Option 3: Azure PowerShell #
- Open PowerShell or PowerShell ISE.
- Run the following command to deploy the template:
New-AzResourceGroupDeployment -ResourceGroupName <resource-group-name> -TemplateFile <path-to-template>Optionally, you can provide additional parameters using the -TemplateParameterFile or -TemplateParameterObject flags.
- Monitor the deployment. Monitor the progress of the deployment. You can view the deployment status, logs, and any error messages in the Azure portal, Azure CLI, or PowerShell, depending on the method you chose for deployment.
- Verify the deployment After the deployment is complete, verify that your Azure resources are successfully provisioned according to the ARM template. Check the Azure portal or use Azure CLI/PowerShell commands to inspect the deployed resources.
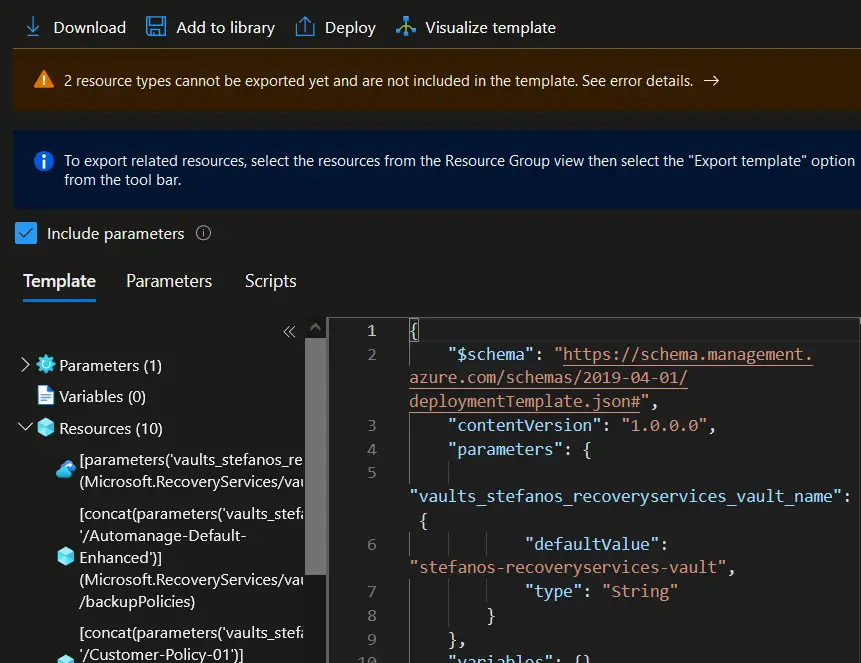
Another approach in creating and deploying Azure ARM templates is to click the "Export template" blade under the "Automation" section of any existing Azure resource.
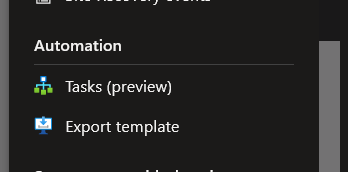
This allows you to download an ARM template for the specific resource (or resource group), add the generated template to an Azure template library or directly deploy the template as a new Azure resource.
At this point you should have created and deployed an Azure ARM template. Repeat these steps as needed for deploying additional templates or updating existing resources. Remember to always validate and test your templates thoroughly before deploying them in production environments.
Nested ARM template deployments basic how-to #
To deploy an Azure Resource Manager (ARM) template using an already deployed Azure resource, you can use the concept of nested deployments. Nested deployments allow you to define a deployment within another deployment, allowing you to deploy additional resources based on the outcome of a previous deployment. To utilize nested deployments for ARM template deployment, carry out the following high-level procedure.
- Create the main ARM template Create a main ARM template that will be used for the initial deployment. This template should include the resource(s) that will trigger the deployment of the secondary template.
- Create the secondary ARM template Create a secondary ARM template that defines the additional resources you want to deploy based on the outcome of the main template's deployment.
- Modify the main template to include nested deployment In the main ARM template, define a nested deployment resource using the
Microsoft.Resources/deploymentsresource type. This nested deployment resource will reference the secondary ARM template. Here's an example snippet of the main ARM template with a nested deployment resource:
"resources": [
  {
    "type": "Microsoft.Resources/deployments",
    "apiVersion": "2021-04-01",
    "name": "nestedDeployment",
    "properties": {
      "mode": "Incremental",
      "templateLink": {
        "uri": "[uri(deployment().properties.templateLink.uri)]"
      },
      "parameters": {
        "param1": "value1",
        "param2": "value2"
      }
    }
  }
]- Deploy the main ARM template Deploy the main ARM template as you would for any ARM deployment, using the Azure portal, Azure CLI, or Azure PowerShell. The deployment of the main template will trigger the deployment of the secondary template through the nested deployment resource.
- Monitor the deployment Monitor the progress of the deployment as usual. You can view the status, logs, and any error messages for both the main deployment and the nested deployment.
- Verify the deployment After the deployment is complete, verify that both the main resources and the resources deployed by the nested template are successfully provisioned. Check the Azure portal or use Azure CLI/PowerShell commands to inspect the deployed resources.
By utilizing nested deployments, you can orchestrate the deployment of additional resources based on the successful deployment of an already deployed Azure resource. This approach provides flexibility and control when deploying complex infrastructure setups. You need to handle any dependencies or sequencing requirements between the resources in the main template and the resources in the secondary template to ensure proper deployment order and resource availability.
Deploy to Azure button #
How to visualize an IaC template #
Visit the separate KB article which discusses available diagramming software for Azure. There are some notable tools which convert a JSON, BiCep, Terraform or YAML IaC notation into a cloud diagram and also assist in creating CI/CD workflows for IaC templates.
How to backup and restore ARM templates for Azure resource groups #
Azure resources are organized into groups in resource groups. Placing some resources into one resource group while placing other resources into another is practically useful for managing resource reporting, billing and monitoring. There are various cases in which you need to export all configuration of one or more Azure resource groups, to be able to restore this configuration onto the same Azure subscription or clone/replicate the configuration via an ARM template to a different Azure subscription.
To export an ARM template of a specific Azure resource group, you can use the following methods
How to troubleshoot Azure IaC templates #
While deploying an IaC template in Azure, you may come across various error messages, such as the following:
- Deployment template validation failed: Circular dependency detected on resource.
You receive this circular dependency error when resources depend on each other in a way that prevents the deployment from starting. A combination of inter-dependencies makes one or more resource wait for other resources that are also waiting. For example, resource1 depends on resource3, resource2 depends on resource1, and resource3 depends on resource2. You can usually solve this problem by removing unnecessary dependencies. ARM templates create an implicit dependency when one resource uses the symbolic name of another resource. An explicit dependency using dependsOn usually isn't necessary.
To solve a circular dependency error:
- In your template, find the resource identified in the circular dependency.
- For that resource, examine the dependsOn property and any uses of the reference function to see which resources it depends on.
- Examine those resources to see which resources they depend on. Follow the dependencies until you notice a resource that depends on the original resource.
- For the resources involved in the circular dependency, carefully examine all uses of the dependsOn property to identify any dependencies that aren't needed. Remove those dependencies. If you're unsure that a dependency is needed, try removing it.
- Redeploy the template.
- Removing values from the dependsOn property can cause errors when you deploy the template. If you get an error, add the dependency back into the template.
References #
- https://learn.microsoft.com/en-us/azure/azure-resource-manager/templates/
- https://docs.microsoft.com/en-us/azure/azure-resource-manager/templates/template-tutorial-create-first-template?tabs=azure-powershell
- https://github.com/Azure/azure-quickstart-templates
- https://docs.microsoft.com/en-us/azure/azure-resource-manager/templates/quickstart-create-templates-use-the-portal
- https://docs.microsoft.com/en-us/azure/azure-resource-manager/bicep/overview?tabs=bicep
- https://github.com/Azure/bicep
- https://endjin.com/blog/2021/11/bicep-streamlines-infrastructure-as-code
- https://zimmergren.net/generate-bicep-templates-from-existing-azure-resources-vscode/
- https://www.varonis.com/blog/azure-bicep
- https://docs.microsoft.com/en-US/samples/browse/?products=azure
- https://azure.microsoft.com/en-us/resources/templates/
- https://learn.microsoft.com/en-us/azure/azure-resource-manager/templates/
- https://docs.microsoft.com/en-us/azure/azure-resource-manager/templates/deploy-to-azure-button
- https://docs.microsoft.com/en-us/azure/azure-resource-manager/templates/deploy-cli
- https://docs.microsoft.com/en-us/azure/azure-resource-manager/templates/deploy-powershell
- https://docs.microsoft.com/en-us/azure/automation/automation-deploy-template-runbook
- https://docs.microsoft.com/en-us/azure/azure-resource-manager/templates/deployment-script-template
- https://docs.microsoft.com/en-us/azure/architecture/guide/azure-resource-manager/advanced-templates/
- https://techcommunity.microsoft.com/t5/azure-developer-community-blog/iac-on-azure-an-introduction-of-infrastructure-as-code-iac-with/ba-p/336095
- https://learn.microsoft.com/en-us/azure/azure-resource-manager/templates/overview
- https://github.com/Azure/azure-quickstart-templates/tree/master
- https://azure.microsoft.com/en-us/products/arm-templates
- https://medium.com/codex/visualizing-your-infrastructure-as-code-azure-bicep-templates-with-the-bicep-vs-code-extension-e9c757c7b9ff
- https://docs.microsoft.com/en-us/azure/azure-resource-manager/troubleshooting/common-deployment-errors
- https://docs.microsoft.com/en-us/azure/azure-resource-manager/troubleshooting/error-invalid-template?tabs=bicep#circular-dependency
- https://docs.microsoft.com/en-us/azure/azure-resource-manager/templates/resource-dependency#circular-dependencies
- https://docs.microsoft.com/en-us/azure/azure-resource-manager/troubleshooting/error-invalid-template?tabs=bicep#solution-5---circular-dependency-detected


