Case #
You have Azure resources in Tenant A, Subscription A (source subscription) and you would like to move the resources to an Azure CSP subscription, i.e. Tenant B, Subscription B (target subscription). Since there is no officially documented procedure on this, I consulted with Microsoft Support and based on their feedback, created the following suggested procedure.

Solution #
You can follow the below official procedure from Microsoft Support team to move resources from your source Azure subscription to an Azure CSP (target) subscription.
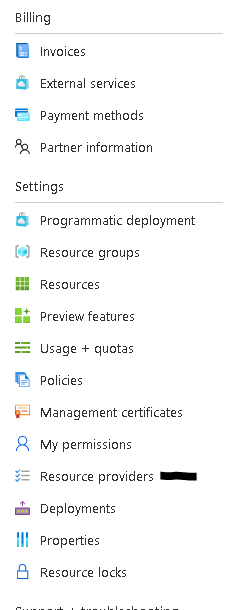
- Ensure that all Azure Resource providers which are registered in the source subscription are also registered in the target subscription. You can get a list of registered resource providers by navigating to the "Resource Providers" menu under the "Settings" section of the subscription in question.
- Move the subscription to the required tenant (in this case this is your CSP tenant): In order to be able to move any resource from subscription A to subscription B, you must have both under the same tenant/directory. The method can vary depending on the subscription types. If the target subscription is CSP, you should follow these instructions: Transfer Azure subscriptions between subscribers and CSPs | Microsoft Docs. Follow the "Other subscription transfers to a CSP partner" section.
- First, you should establish a Reseller relation. Both the Partner and the customer should follow this document: Request a reseller relationship with a customer - Partner Center | Microsoft Docs.
- The Partner should create a target subscription within the CSP tenant.
- To have both subscriptions, source and target, under the same tenant. You may follow this document: Add an existing Azure subscription to your tenant - Azure AD | Microsoft Docs.
Important note:
To be able to move a subscription from the source to the target (CSP) tenant, the user performing the move must be a native user in the target subscription and must be granted owner permissions on the source subscription to be moved to the CSP tenant. In order to achieve this, you will need to use the Identity and Access Management section (IAM) of the Subscription blade in the Azure management portal under the source subscription and assign the owner permission at subscription level to the CSP tenant administrator user who will be performing the move. To do this, you must first add the CSP admin user as a guest user in the source tenant. If this admin user has an active/routable email address, they they can accept the invitation to become guest. If they do not have an active email, then the only way to accept the guest status is the following:
- Navigate to the Azure Active Directory blade of the source tenant and choose "Users".
- Click on the CSP admin user who has been added as a guest.
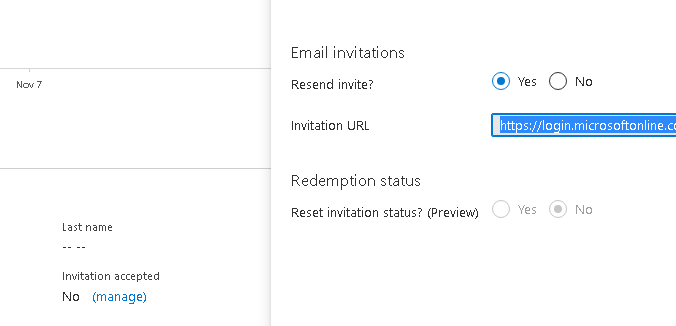
- Click on "Manage" under "Invitation Accepted" field.
- Click "Yes" in the "Resend invite?" field and copy the invitation URL.
- Open the invitation URL while being logged on as the CSP admin user and accept the invitation.
After the above steps, the CSP admin user will be able to see both source and target tenants and both source and target subscriptions and thus be able to perform a) subscription move between tenants and b) resource move between subscriptions.
When the subscription is successfully moved to the target tenant, you will get the following notification.
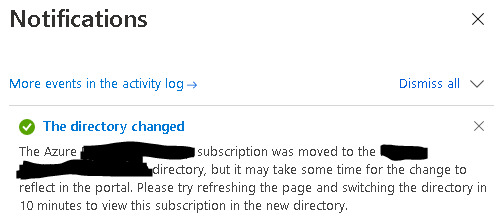
Please be aware that you may to wait for up to 30 minutes before you can see and manage the moved subscription in the target tenant.
2. Start to plan the resource movement: After associating or adding the source subscription to the CSP tenant, you can start planning the resources movement.
- The user account, used to transfer any resource, must have Owner permission on both source and target subscriptions.
- You can start to list all the supported resources to be moved to a different subscription. For this you can search for "Resource explorer" on the Azure Portal, select the source subscription, and then "Providers". You will see several dropdowns containing your resources categorized by Resource Providers. Then, you should check this document to confirm if those resources are supported to be moved or not: Move operation support by resource type - Azure Resource Manager | Microsoft Docs.
- In case you find any unsupported resource, you may consider to re-deploy it on the new subscription with the same properties.
3. Check if you have any resource with special conditions or limitations: There are certain resources which may need some work before trying to move them. Check if you have any and check the specified document for it.
- If you're using Azure Stack Hub, you can't move resources between groups.
- App Services resources: https://docs.microsoft.com/en-us/azure/azure-resource-manager/management/move-limitations/app-service-move-limitations
- Azure Devops: https://docs.microsoft.com/en-us/azure/devops/organizations/billing/change-azure-subscription?toc=/azure/azure-resource-manager/toc.json
- Classic Resources: https://docs.microsoft.com/en-us/azure/azure-resource-manager/management/move-limitations/classic-model-move-limitations
- Network and related resources (VMs, Gateways, NICs, etc.): https://docs.microsoft.com/en-us/azure/azure-resource-manager/management/move-limitations/networking-move-limitations
- Recovery services resources: https://docs.microsoft.com/en-us/azure/backup/backup-azure-move-recovery-services-vault?toc=/azure/azure-resource-manager/toc.json
- Virtual Machine resources: https://docs.microsoft.com/en-us/azure/azure-resource-manager/management/move-limitations/virtual-machines-move-limitations
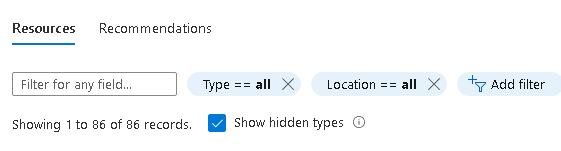
When using the portal to move your App Service resources, you may see an error indicating that you haven't moved all of the resources. If you see this error, check if there are resource types that the portal didn't display. Select Show hidden types. Then, select all of the resources to move.
4. Organize resources per resource group: Once you checked the above articles as you need, you may determine what resources are related with each other and move them together on the same Resource Group. Just as mentioned here: Move resources to a new subscription or resource group - Azure Resource Manager | Microsoft Docs.
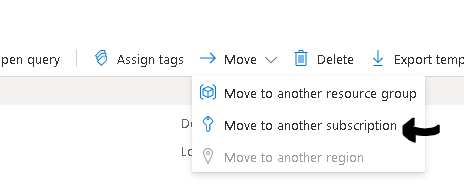
5. Proceed to move the resources: Now you can try to move the resources. This is made by one Resource Group at a time. Follow instructions in this document: Move resources to a new subscription or resource group - Azure Resource Manager | Microsoft Docs.
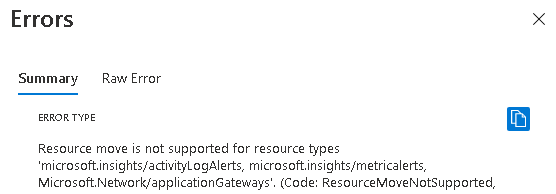
Always pay attention to the resource move validation rules which are executed before the move starts. Ensure that you have corrected any reported issues or have removed any resources which cannot be moved between subscriptions by design, as shown in the example below. When all validation rules are green/passed, you can safely proceed with resource move.
Finally, remember to update any tools or scripts which have references to the old Resource IDs, to start using the new Resource IDs.

Sources #
- https://social.technet.microsoft.com/wiki/contents/articles/51360.azure-how-to-move-resources-between-subscriptions-under-different-tenants.aspx
- https://docs.microsoft.com/en-us/azure/azure-resource-manager/management/move-support-resources
- https://docs.microsoft.com/en-us/azure/cost-management-billing/manage/transfer-subscriptions-subscribers-csp#other-subscription-transfers-to-a-csp-partner
- Move resources to a new subscription or resource group - Azure Resource Manager | Microsoft Docs
- https://docs.microsoft.com/en-us/azure/cost-management-billing/manage/transfer-subscriptions-subscribers-csp#other-subscription-transfers-to-a-csp-partner
- https://docs.microsoft.com/en-us/azure/azure-resource-manager/management/move-resource-group-and-subscription
- https://docs.microsoft.com/en-us/azure/active-directory/fundamentals/active-directory-how-subscriptions-associated-directory


