Case #
You recently updated your Office 365 Apps in one or more machines, only to find out that this update broke some functionality of your Office Apps or other integrated application. You need to revert to the previous version of Office 365 by utilizing the Office Deployment Tool (ODT). This article provides instructions on how to revert to previous version of Microsoft 365 apps.
If you need to deploy older (legacy) versions of Office 365 apps in Windows 7 or Window 8 machines, refer to the following article: https://stefanos.cloud/kb/how-to-deploy-office-365-apps-on-windows-7-sp1-and-windows-8/.
Solution #
To revert to previous version of Microsoft 365 apps, carry out the following steps.
Determine release channel and version build number #
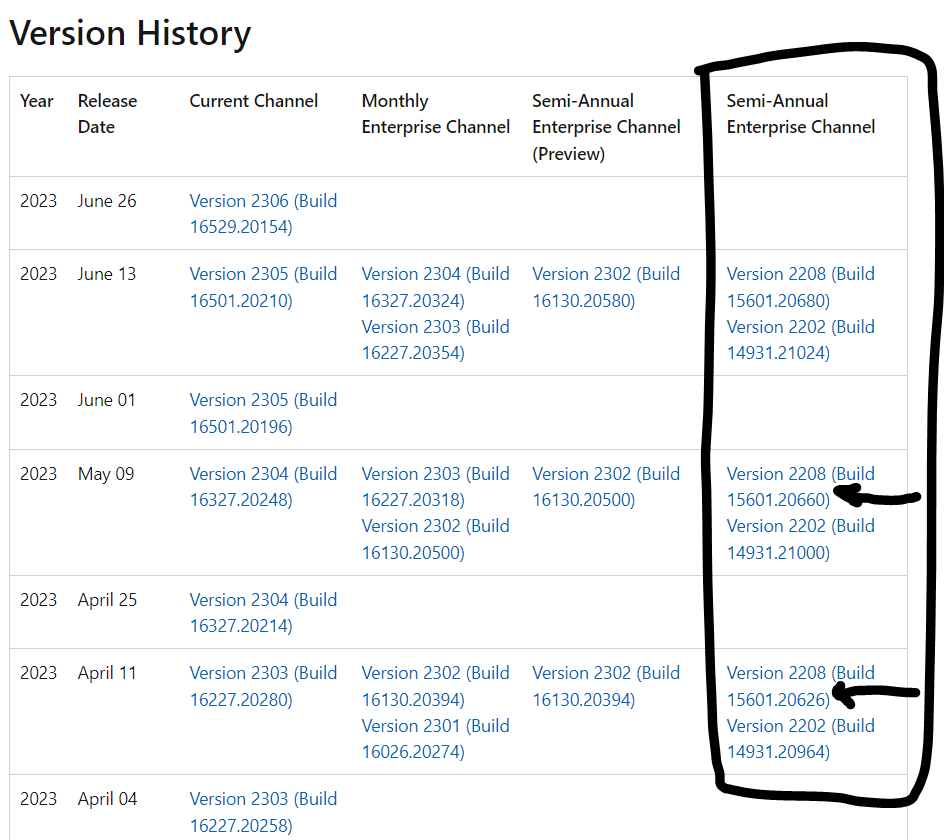
Determine which release channel your Office365 apps belong to, by consulting the following article, in which versions are listed by date: https://learn.microsoft.com/en-us/officeupdates/update-history-microsoft365-apps-by-date. As an example, consider the case in which you have a "Semi Annual Enterprise Channel" with version 2208 installed. This should take you to the last column of the version history table and therefore you should aim for releases with build number 15601.20680, 15601.20660, and so forth.
Create ODT configuration file #
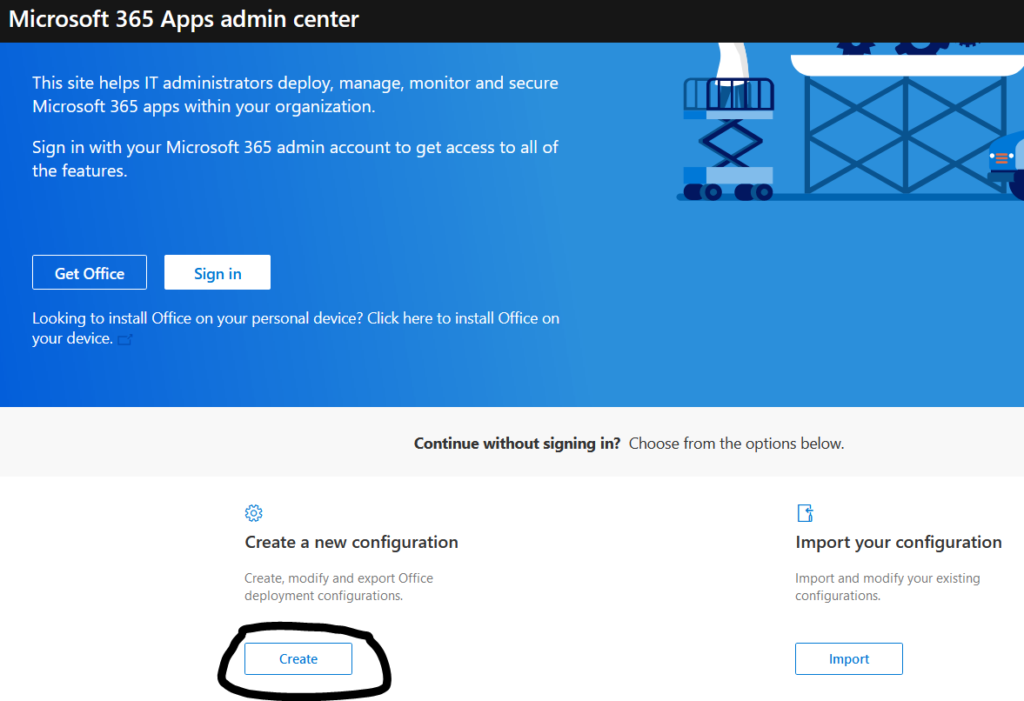
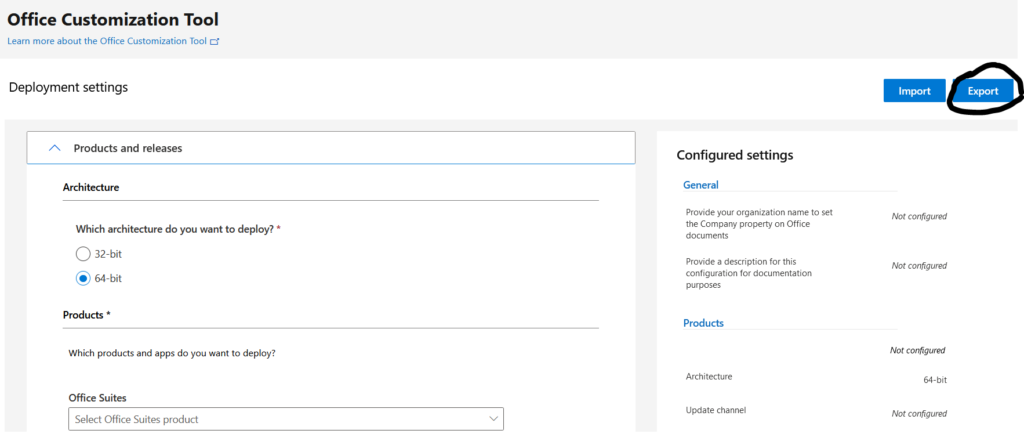
You should navigate to https://config.office.com (Office customization tool) to create and export a configuration for the Office Deployment Tool (ODT). Ensure that you reflect your environment's requirements into the .xml file to be exported.
A sample configuration file could look like the following. Remember to se the "SharedComputerLicensing" parameter to value "1" in hosted VDI environments, to enable Shared Computer Activation (SCA). More details on the configuration options can be found at: https://learn.microsoft.com/en-us/deployoffice/office-deployment-tool-configuration-options.
<Configuration ID="30cac4af-899b-481f-8ecd-b091f8640a0e">
  <Add OfficeClientEdition="64" Channel="Broad">
    <Product ID="O365ProPlusRetail">
      <Language ID="en-us" />
      <ExcludeApp ID="Groove" />
      <ExcludeApp ID="Lync" />
      <ExcludeApp ID="OneDrive" />
    </Product>
    <Product ID="LanguagePack">
      <Language ID="en-us" />
      <ExcludeApp ID="Groove" />
      <ExcludeApp ID="Lync" />
      <ExcludeApp ID="OneDrive" />
    </Product>
  </Add>
  <Property Name="SharedComputerLicensing" Value="1" />
  <Property Name="PinIconsToTaskbar" Value="TRUE" />
  <Property Name="SCLCacheOverride" Value="1" />
  <Property Name="AUTOACTIVATE" Value="0" />
  <Property Name="FORCEAPPSHUTDOWN" Value="FALSE" />
  <Property Name="DeviceBasedLicensing" Value="0" />
  <Property Name="SCLCacheOverrideDirectory" Value="C:\Users\%Username%\AppData\Roaming\O365LicenseToken" />
  <Updates Enabled="TRUE" />
  <RemoveMSI />
  <AppSettings>
    <User Key="software\microsoft\office\16.0\excel\options" Name="defaultformat" Value="51" Type="REG_DWORD" App="excel16" Id="L_SaveExcelfilesas" />
    <User Key="software\microsoft\office\16.0\powerpoint\options" Name="defaultformat" Value="27" Type="REG_DWORD" App="ppt16" Id="L_SavePowerPointfilesas" />
    <User Key="software\microsoft\office\16.0\word\options" Name="defaultformat" Value="" Type="REG_SZ" App="word16" Id="L_SaveWordfilesas" />
  </AppSettings>
  <Display Level="Full" AcceptEULA="TRUE" />
</Configuration>
Download and run ODT #
You should download the Office Deployment Tool from https://www.microsoft.com/en-us/download/details.aspx?id=49117.
Then first run ODT setup.exe with the /download flag and immediately after the Offie 365 binaries have been downloaded, run the ODT tool again this time with the /configure flag.
#First with /download flag and wait for the "Office" folder to be populated with binaries.
setup.exe /download downloadconfig.xml

#Then with /configure flag in order to configure the Office 365 apps as per the configuration parameters inside the .xml file
setup.exe /configure installconfig.xml


