Case #
This article provides guidance on how to mount file and block storage to Windows. There are various cases and scenarios in which you have a file-based, block-based or object-based storage system and you create file shares or block storage LUNs in it, which you then need to mount to a Windows machine. There various file-based storage protocols available, such as NFS and CIFS/SMB. There are also various block-based storage protocols available such as iSCSI, FCoE and FC. In the case of public clouds (for example Microsoft Azure Storage) and in the world of containers, most storage systems utilize object-based storage. Examples of container object-based storage include Ceph and GlusterFS as well as Azure blob storage and Amazon S3 storage. A good comparison of object storage vs block storage can be found at: https://phoenixnap.com/blog/object-storage-vs-block-storage.
The article provides high level guidance and command line templates on how to mount file and block storage to Windows, in the form of mapped network drives or network disks.
Solution #
File storage #
CIFS/SMB #
For CIFS/SMB, Windows have native client support, so all you need to do to mount an SMB/CIFS share is run the following command in elevated command prompt or Powershell, to create a mapped network drive.
#Create mapped network drive
#Provide credentials if needed or omit the /user: parameter and password for anonymous access
net use M: \\hostname\sharename /PERSISTENT:YES /user:domain\username thisisthepass

#Remove mapped network drive
net use  M: /delete
Always ensure that the latest version of the SMB/CIFS protocol is configured on both the server and client machines.
NFS #
For NFS, you need to install the NFS client on the Windows machine first. Go to Windows Programs and Features and click on "Turn Windows features on or off". Check the "Client for NFS" checkbox and click OK.

Or in the case of a Windows Server machine, install the "client for NFS" feature.

After the NFS client is enabled, you should be ready to proceed with following steps.
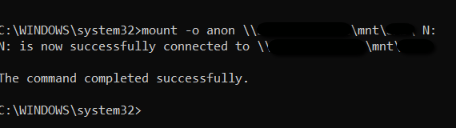
# Create a mapped network drive as NFS share
mount -o anon \\[server IP address]\mnt\[mount path name] Z:

#The above command will only grant the anonymous user with read access to the NFS share
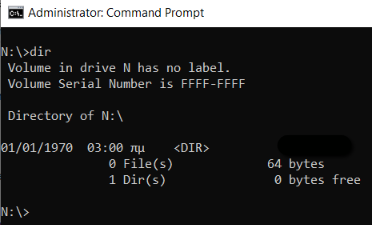
You show now be able to manage the NFS share by using the command line.
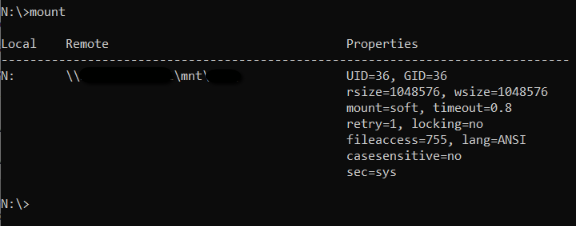
The mount command will also provide details about the NFS mount.
If you need to assign write access to your anonymous user, you need to change the AnonymousGid and AnonymousUid entries with proper values from the NFS server and reboot your Windows NFS client.

Azure Files #
Make use of the following Powershell script to mount an Azure File share to your Windows machine.
$connectTestResult = Test-NetConnection -ComputerName [storageaccountname].file.core.windows.net -Port 445
if ($connectTestResult.TcpTestSucceeded) {
    # Save the password so the drive will persist on reboot
    cmd.exe /C "cmdkey /add:`"[storageaccountname].file.core.windows.net`" /user:`"localhost\[storageaccountname]`" /pass:`"[storageaccountkeyhere]`""
    # Mount the drive
    New-PSDrive -Name Z -PSProvider FileSystem -Root "\\[storageaccountname].file.core.windows.net\test" -Persist
} else {
    Write-Error -Message "Unable to reach the Azure storage account via port 445. Check to make sure your organization or ISP is not blocking port 445, or use Azure P2S VPN, Azure S2S VPN, or Express Route to tunnel SMB traffic over a different port."
}

#Now you may need to run below command again
New-PSDrive -Name Z -PSProvider FileSystem -Root "\\[storageaccountname].file.core.windows.net\test" -Persist
The permissions levels are granted from the configuration of the Azure Storage Account key. If you need to use Azure AD DS or AD DS for customizing permissions to the Azure Files share, further configuration is required on the Azure side. In that case, a different script should be used for mounting the Azure Files share.
Block storage #
iSCSI and FCoE #
For iSCSI targets, you need to setup the Windows iSCSI initiator. The the target storage volume (LUN) should be shown on the Windows machine as a local physical hard disk.
To setup your iSCSI target with the Windows iSCSI initiator, follow the steps below.
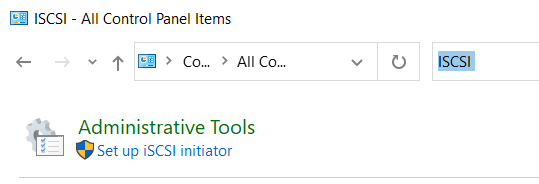
- Launch the iSCSI initiator at Control Panel > Tools.
- On the iSCSI Initiator Properties page, click Targets.
- Enter the IP address of the target iSCSI storage system and then click Quick Connect.

- Choose the discovered Target(s) and Click Connect.
- Click OK.
Bear in mind that you may need to also install the Windows MPIO feature for Multipath Input Output support. In this case, you should need to configure all the available multipath targets in the iSCSI listener.
A very similar approach should be taken in the case of the FCoE protocol. In this case we need an FCoE initiator instead of an iSCSI initiator.
FC #
To mount an FC storage LUN to a Windows machine, you need to configure an FC Host Bus Adapter (HBA). A host bus adapter (HBA) is a circuit board or integrated circuit adapter that connects the Windows host machine to the FC storage device. The HBA also provides I/O to reduce the Windows machine CPU utilization when storing and retrieving data. For instructions on how to setup an FC HBA on a Windows Server with Hyper-V role installed, refer to the following article: https://www.broadcom.com/support/knowledgebase/1211161394889/how-to-configure-emulex-fibre-channel-hbas-with-hyper-v-virtual-.
Object storage #
Azure Blob container #
You can mount an Azure blob container as a Windows mapped drive by utilizing the NFS protocol. The commands to use to mount an Azure blob container as a Windows mapped drive via NFS can be found at https://learn.microsoft.com/en-us/azure/storage/blobs/network-file-system-protocol-support-how-to?tabs=windows.


