This article provides guidance on how to manage Microsoft 365 user role assignments and administrative units. The article is also available on my podcast and Youtube channel.
View this article as a how-to video on Youtube.
Case #
You need to manage existing user roles, create new custom user roles and assign users and groups to existing roles in Microsoft 365. You need to also manage Microsoft 365 administrative units.
Solution #
In this how-to article, we will show you how to manage Microsoft 365 user role assignments and administrative units.
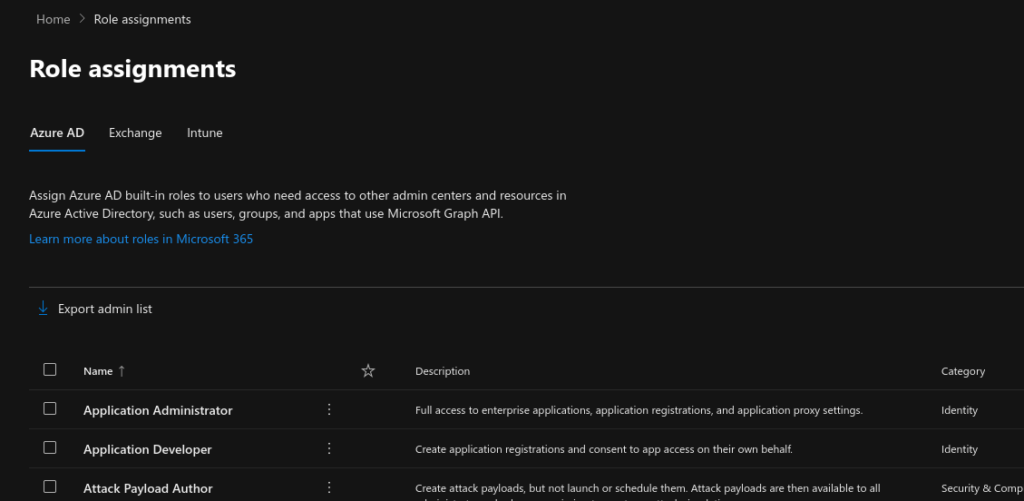
Role assignments #
From within the Microsoft 365 Admin Center portal, you can assign Azure AD built-in roles to users who need access to other admin centers and resources in Azure Active Directory, such as users, groups, and apps which use Microsoft Graph API. The following groups of user role assignments can be made from the Admin Center portal.
- Azure AD role assignments
- Exchange Online role assignments
- Intune role assignments
In the next steps, we will show you how to assign the Global Administrator Azure AD role to a user and group. Follow the steps below to assign the Global Administrator role to a user or group.
- Navigate to https://admin.microsoft.com and authenticate as a global admin user.
- On the left pane, expand the "Roles" section and click on "Role assignments". On the main section click on the "Global Administrator" role. On the popup form on the right, you should be able to review the general properties of the role in question. On the permissions tab, the system lists details of the permissions which are assigned with the role in question.
- On the "Assigned" tab, you can assign users or groups to the role in question. Click on "Add Users" and then "Add Groups" to add a user and group respectively to the specific role.
- To run the Azure portal as a specific Azure AD user role, tick on the checkbox next to the role and click "Run As". This will show you the view of the Azure portal as if you had logged in via a user with the role in question.
- To compare permissions of user roles, tick on two or more roles and then click on "Compare Roles". In the next screen, you should see a tabular comparison of the permissions assigned to each of the compared roles. You can also click on "Export comparison" to export the comparison matrix of the selected roles.
In the next steps, we will show you how to assign the Organization Management Exchange Online role to a user and group, as well as how to create a new custom Exchange Online role. Follow the steps below.
- Navigate to the "Exchange" tab under the "Role Assignments" section.
- Click on the "Organization Management" role. On the popup form on the right, you can review the general settings of the role under the "general" tab. Under the "Permissions" tab, you can review in detail the available permissions of the role in question.
- Under the "Assigned" tab, you can assign a user or group to the role in question. Click "Add" and choose the user or group to assign to the role.
- You can also create a custom Exchange Online role by ticking the checkbox next to the role which will be used as the template for the new role. Then click on "Copy role group". This will take you to a wizard to create your new custom role. On the "Set up the basics" page, fill-in the name, description and write scope of the new role and click Next.
- Select the roles to add to the new custom role group. Roles define the scope of the tasks that the members assigned to this role group have permission to manage.
- Select the users to assign to this role group. They'll have permissions to manage the roles that you assigned in the previous step.
- Review your selections and click Finish.
In the next steps, we will show you how to assign Intune roles. Assign Intune roles to specialists who need to view or manage Intune data, devices, or services. These roles can only be assigned to users who have a license that includes Intune. Follow the steps below.
- Under the "Role assignments" section, navigate to the "Intune" tab. If you need to export existing assignments, click on the "Export assignments" button.
- Click on the Intune role you wish to edit assignments of. On the "General tab" you can review the general settings of the role in question. On the "Permissions" tab you can see in detail all permissions of the role in question.
- To assign users to the Intune role, under the "Assigned" tab click on "Add". This will take you to the "Set up the basics" wizard. Fill-in a name and description and click Next.
- Select the security groups that contain the users you want to become admins for the role. Click Next.
- Select a built-in security group like 'All users', or search for and select security groups which contain the users and devices that the Intune role can manage.
- You can optionally add tabs which limit the specific Intune policies, apps and devices that the admins can see. Click "Next".
- Review all your assignment settings and click "Finish".
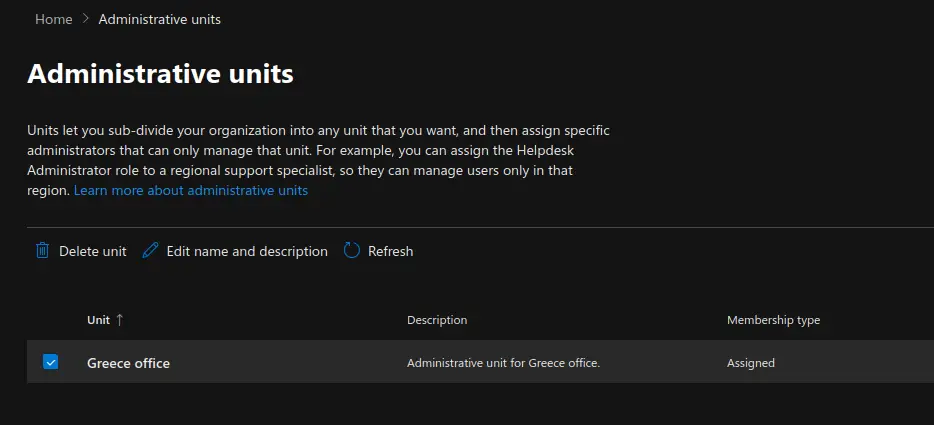
Administrative Units #
Now we will move on to show you how to create and manage Microsoft 365 Administrative Units. Units let you sub-divide your organization into any unit that you want, and then assign specific administrators that can only manage that unit. For example, you can assign the Helpdesk Administrator role to a regional support specialist, so they can manage users only in that region.
Carry out the following steps:
- Under the "Roles" section, click on "Administrative Units". Click on "Add Unit" to add a new administrative unit.
- Provide a name and Description of the new administrative unit and click "Next". Administrative units let you limit admins to manage users for a specific department, region, or any segment that your organization defines. Start by giving the administrative unit a name and description that will let other admins know its purpose.
- Choose "Add up to 20 users and groups" or "Upload users" if you need to bulk upload a large number of users to be linked to the new administrative unit. If you choose "Add up to 20 users and groups", then click on "Add Users" or "Add Groups" to add the desired users to the administrative unit and click Next. The administrators assigned to this unit will manage the settings for these users and groups. Adding groups doesn't add users to the unit, it lets the assigned admins manage group settings. You can only add up to 20 members individually or you can bulk upload up to 200 users. If you need to add more, you can edit this unit to add them.
- Assign admins to scoped roles. The following roles are the only roles that support administrative units.
Authentication Administrator
Cloud Device Administrator
Groups Administrator
Helpdesk Administrator
License Administrator
Password Administrator
SharePoint Administrator
Teams Administrator
Teams Device Administrator
User Administrator.
Select a role and then assign admins to it. The admins that you assign to roles in this step will manage the members of this administrative unit.
- Review your selections and click "Finish". The new administrative unit has been created. You can always edit its properties by clicking on the Administrative Unit name. From that page you can edit the administrative unit's members and role assignments.
- You can also edit the name and description of an administrative unit by ticking the checkbox next to the administrative unit name and clicking on "Edit name and description".


